You want to renovate a room and make it more appealing but don’t know what to do? Then perhaps learning how to build a soffit box with recessed lighting would be a good idea.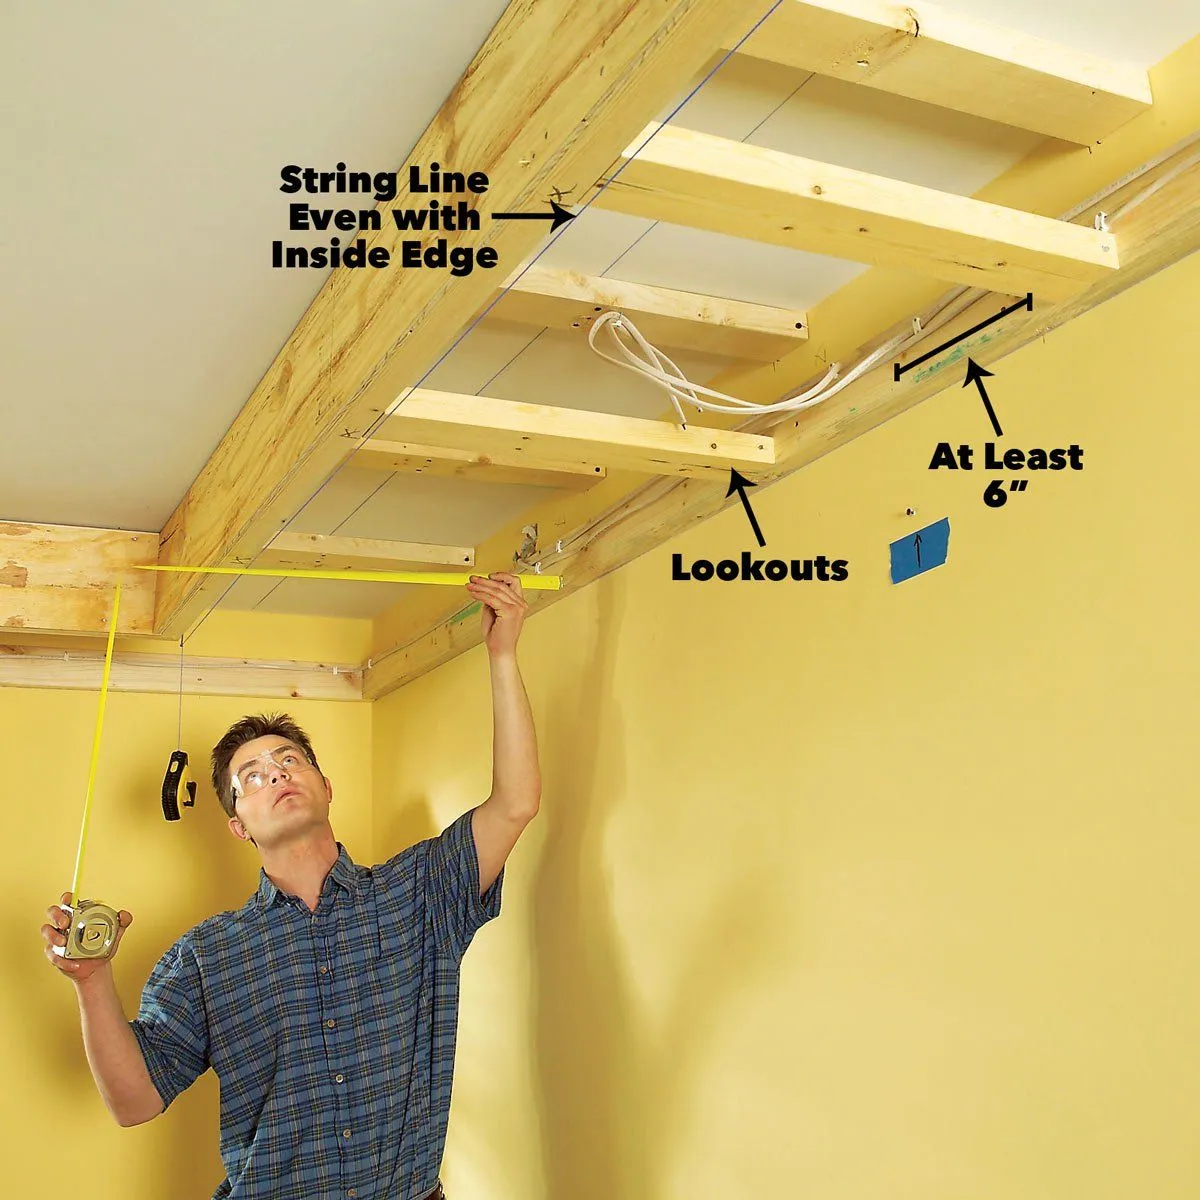
Overview
A room without features is pretty plain but major renovating projects may require money and time you can ill afford. In that case, how about you do something which requires little expense yet still sufficient to liven up the space? You can enhance the house interior aesthetic value along with general lighting by carrying out a simple soffit project.
While this is not exactly a walk in the park, you can do it as long as you know the basic points. No worry if you are completely clueless though because you can find a step by step instruction right here. This article will show you how to build a soffit box with recessed lighting in five steps by yourself.
The required tools and materials for the job
If you happen to be a woodworking enthusiast, you might have the most of what you need on hand. You can find everything you want at a local hardware store as well, pay it a visit if needed. Namely, you must have cleats, recessed lighting fixtures, drywall sheets, plenty of screws, a couple of plywood planks and beams.
For the tool, you will need a hammer, a drill, a saw, a tape measurement and a marker. While doing this, you will inevitably encounter a lot of dust and splinter so protections gears are mandatory here. Make sure that you have a pair of goggles, gloves, and facemask on at all time until the very end.
When you complete the preparation then it is time to get to work. Should the project proceed smoothly, there won’t be a need to repair drywall and ceiling in the aftermath. The wires will run inside the soffit, therefore, you don’t have to alter the walls for the electrical works.
Recessed light choices
One of the primary components of this project is the recessed light, you have to choose a suitable product. Generally, there are two criteria you should take into account when it comes to recessed lighting: Type and Power. Buying on a whim without serious consideration could cost you money for a product with less than ideal performance.
Recessed lights mainly come in two variants which are the Flood lamb and the Spot lamb for different requirement. The former focus its light on particular areas while the latter illuminates over a considerable amount of space. It’s advised to purchase fixtures with a six inches diameter and labeled “remodeling” because they don’t need a special framing.
Finally, the power rating of the recessed light must be compatible with the house electrical system. Every model has a wattage limit but the maximum output is not always what you want. Try out a variety of products to check out their performance then select one that suits you the most.
The procedures
Step 1: Draw out the soffit design and wiring scheme
Before you can actually start, take your time to imagine the ideal specification of the soffit and the associated features. The weight and height of a soffit depend entirely on the size of the room you intend to install it in. In an average case, the minimal dimension of a soffit is approximately eight-inch height and twenty-eight inch width.
A diagram that shows the light and switch positions is excellent in order to plan an efficient wiring plan. It’s wise to ensure the power rating of the soffit light bulbs and everything else on the circuit is acceptable. If the total amperage load is around eighty percents of the circuit rating, consider a revision.
Where you locate the switch is essential if you want to operate the bulbs with ease and do the wiring. It should be reachable with a cable from the power supply and convenient to accesses whenever you want. All of this could take plenty of times and efforts yet it is smooth sailing from here on.
Step 2: Mark the soffit light and frame location
Walk around the room that you want to install the soffit and figure out an ideal spot. Of course, it must have enough space to accommodate the soffit components and match your previous planning. Entry area, shelf, tablet and reading space are several notable examples you should keep an eye out.
Measure the space and mark it with the soffit shape to assist the upcoming installation. Try to be as precise as possible to achieve a satisfying result in the end.
Step 3: Get the frame in
Attach the cleats and anchor the frames using screws, you can do these by a variety of method so do what you like. Promptly screw in plywood blocks to the ceiling joists and the end to form a rectangular prism. You can do this rather fast if you have carpentry experience, otherwise, don’t rush and take your time.
Step 4: Do the wiring and finish up
Carefully cut holes to slide a cable into the soffit, split it into different wires and hook them to the light fixtures. Keep in mind that the gap between the cable and the planned fixtures must be at a uniform length. After that, the only thing left is to connect the cable to the switch and the power source.
But before you can do that, you must finish walling up the soffit first and punch holes for the fixtures. It’s quite easy, you simply have to screw in drywall sheets around the soffit using the plywood frame as the base. On the bottom sheet, mark and saw out a couple of holes for the fixtures.
Step 5: Tear-away edging
The soffit is ready now but there is another thing you can do to preserve it. With the help of tear-away edging, the drywall sheets shall stay exactly as they are for a long time. Apply two layers of taping compound, let it dry between each application and your job is finish.
Conclusion
And that is how to build a soffit box with recessed lighting in five steps, not too difficult to understand, right? It could be a bit tricky at first but when you got the hang of it, it’s really simple. With the information above, you can create a beautiful soffit by yourself as well.